logo
  • Home
  • FAQ
  • ☰
  1. Knowledge Base
  2. Normal Brain MRI
  3. Approach to MRI
Approach to MRI
7 Aug, 2025
Normal Brain MRI

In order to properly introduce brain imaging, before even starting to think about anatomy or pathology, we must talk about how to approach a brain MRI.

In most clinical circumstances, one would be exposed to an MRI of the brain through a viewing software where the user can change the view, the slice and the sequences at will. However, in research settings, we are often exposed to brain MRIs in the context of poster presentations or rapidly changing PowerPoints slides at a talk where it becomes a game of rapidly identifying the salient findings presented to us.

Regardless of the context in which the image is presented, the following principles will be helpful to any beginner approaching a brain MRI.

First, identify the sequence. Different sequences will cause the same structure to appear differently and make others easier or harder to visualize. You can use the following approach to identify the sequence you’re in for brain MRIs:

  • Ask, is the white matter brighter that the grey matter?
    • If yes, then you are in T1.
    • If no, then ask:
  • Is the CSF bright (high signal intensity)?
    • If yes, then you are in T2.
    • If no, you are likely in FLAIR.

Second, identify the view. Is the image cut in axial, coronal or sagittal?

Third, identify the level of the section. This step requires the use of your anatomic knowledge to identify landmarks that might give you a clue as to what level the section is performed at. Different landmarks might be useful for different planes.

For example:

  • Coronal: I find it really useful to look at the shape of the ventricles to determine how anterior or posterior the section is.
    • Other big landmarks include whether or not the temporal lobe, the third ventricle, or the cerebellum is visible on the section.


  • Figure 1: Coronal slices anterior to posterior with the lateral ventricles indicated by red arrows. A) Most anterior slice at the level of the head of the caudate- note the short, upturned appearance. B) Moving a few slices posterior, we reach the level of the lentiform nuclei- note the butterfly shape of the two ventricles together. C) At the level of the thalamus- note the appearance of the third ventricle (midline strip of black) and how the lateral ventricles now look like an upturned bowl. D) Arriving at the level of the trigone, each lateral ventricle take on a “chicken drumstick” shape. E) Most posterior slice before the lateral ventricles elongate into the posterior horns (often difficult to appreciate in a normal, non atrophied brain as they are very small).

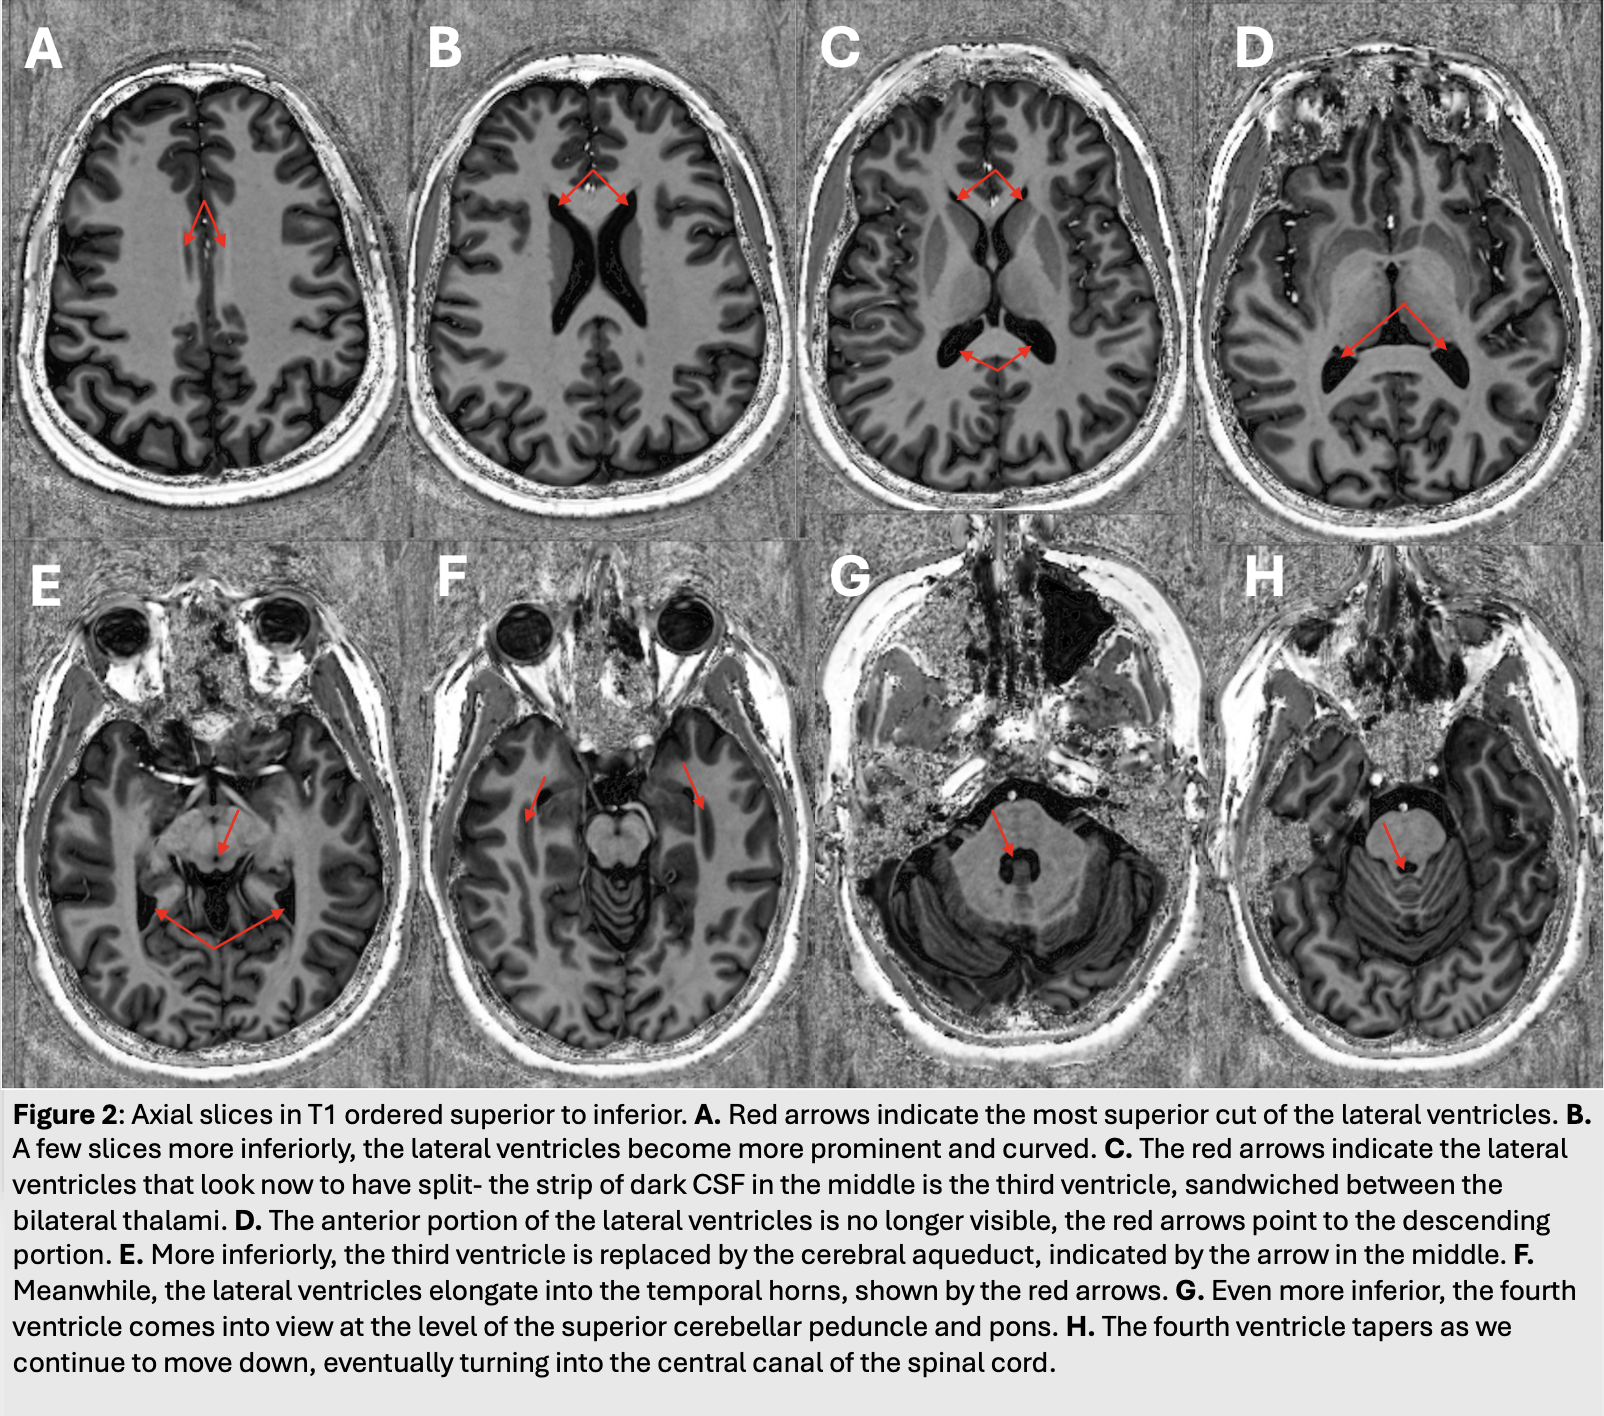
  • Axial: The appearance of the ventricles is once again a great landmark of the level. Once in the brainstem, the cross-section appearance of the brainstem as well as the ventral arteries can give you a good clue about which level of the brainstem you are looking at.


  • Figure 2: Axial slices in T1 ordered superior to inferior. A) Red arrows indicate the most superior cut of the lateral ventricles. B) A few slices more inferiorly, the lateral ventricles become more prominent and curved. C) The red arrows indicate the lateral ventricles that look now to have split- the strip of dark CSF in the middle is the third ventricle, sandwiched between the bilateral thalami. D) The anterior portion of the lateral ventricles is no longer visible, the red arrows point to the descending portion. E) More inferiorly, the third ventricle is replaced by the cerebral aqueduct, indicated by the arrow in the middle. F) Meanwhile, the lateral ventricles elongate into the temporal horns, shown by the red arrows. G) Even more inferior, the fourth ventricle comes into view at the level of the superior cerebellar peduncle and pons. H) The fourth ventricle tapers as we continue to move down, eventually turning into the central canal of the spinal vord

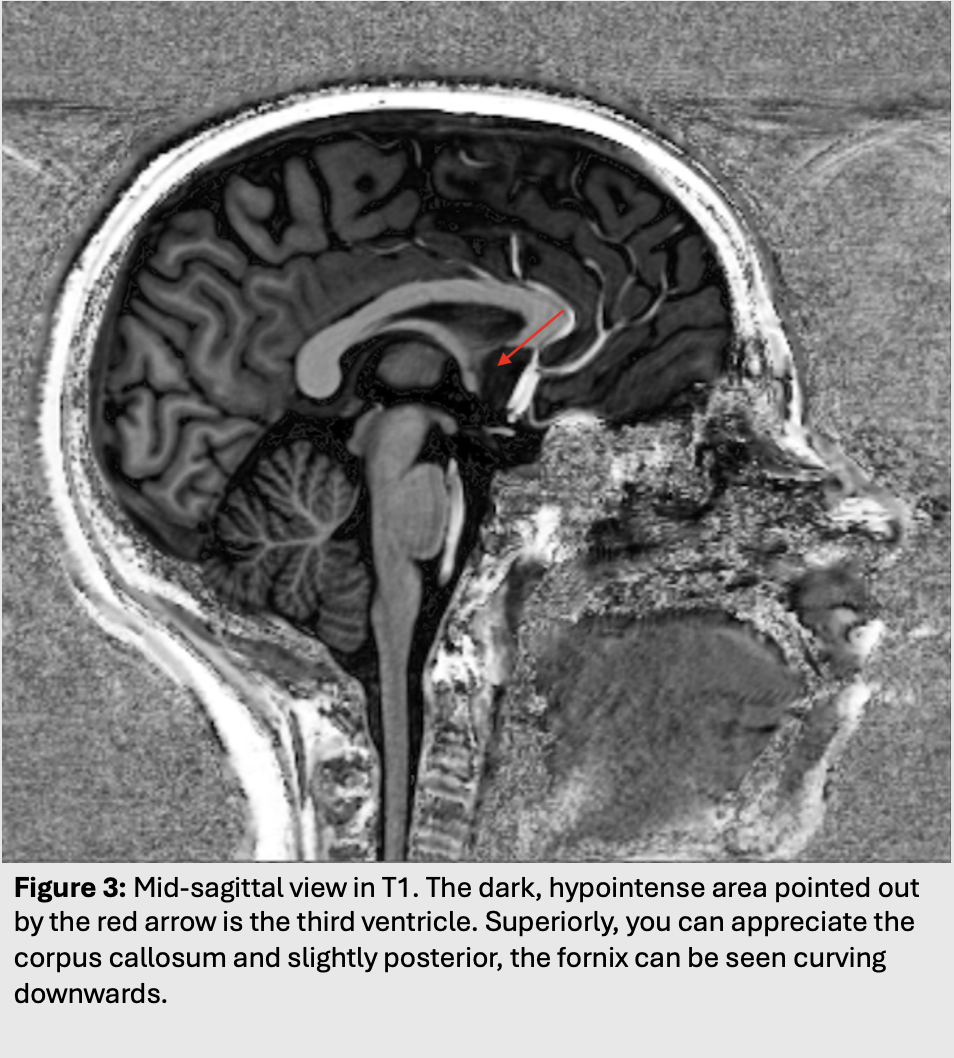
  • Sagittal: Best to always start midline! Identify the midline by finding the third ventricle (dark on T1 and FLAIR) and the pituitary sella.
  • Figure 3: Figure 3: Mid-sagittal view in T1. The dark, hypointense area pointed out by the red arrow is the third ventricle. Superiorly, you can appreciate the corpus callosum and slightly posterior, the fornix can be seen curving downwards.


  • Finally, the last step is to read. Whenever you approach a brain MRI, you should always be looking to answer a question.

    Maybe it’s to rule out a certain pathology and make sure every area of the brain looks normal.

    Maybe it’s to look for a pathological pattern specific to a disease, such as MS. Maybe it’s simply to verify if you can identify the findings in a brain MRI that someone else has reported to you.

    Previous
    Next
    About

    Brain Imaging Essentials is an educational project launched by the students of the La Piana lab aiming to make brain MRIs more accessible for students around the world!

    We've created simple, digestible content that will help learners develop a basic understanding of the clinical and research relevance of different kinds of neuroimaging, as well as an approach to brain MRI.

    Join our mailing list iby scanning this QR code f you want to stay tuned for new updates and events!

    Contact Us

    Interested in our research or future collaborations?

    Please contact Joyce Li at joyce.li2@mail.mcgill.ca or Dr. La Piana by email at roberta.lapiana@mcgill.ca

    Copyright © 2025 Joyce Li